自定义扩展编辑器
自定义 GUI 布局、样式
EditorGUILayout 和 EditorGUI 提供给开发者极大的自定义编辑器的空间。通过实例化 GUIContent GUILayout GUIStyle 等类并以参数的形式传递给相关的静态函数,开发者就可以自定义编辑器中 GUI 组件的布局和显示样式。
GUILayout可用于定义指定布局方式的GUILayoutOption参数列表。
以下是上述三个类的详细用法:
GUIContent
| 说明 | 类型 | 使用方法 |
|---|---|---|
| 快速生成一个空内容 | 静态属性 | none |
| 图标 | 属性 | image |
| 文本内容 | 属性 | text |
| 提示内容 | 属性 | tooltip |
| 生成一个空内容的构造函数 | 构造函数 | GUIContent |
GUILayout
| 说明 | 类型 | 使用方法 |
|---|---|---|
| 定义绝对宽度、绝对高度 | 静态函数 | Width Height |
| 定义最大宽度、最大高度 | 静态函数 | MaxWidth MaxHeight |
| 定义最小宽度、最小高度 | 静态函数 | MinWidth MingHeight |
| 定义是否允许水平、垂直伸长 | 静态函数 | ExpandWidth ExpandWidth |
GUIStyle
| 说明 | 类型 | 使用方法 |
|---|---|---|
| 快速生成一个空样式 | 静态属性 | none |
| 当控制区域被鼠标点击/键盘聚焦/鼠标悬停/正常显示时的渲染样式 | 属性 | active focused hover normal |
| 文本的对齐方式 | 属性 | alignment |
| 边框/GUI 元素间的空隙/从边界到显示内容之间的空白 | 属性 | border margin padding |
| 当显示内容超出给定区域时的处理方式 | 属性 | clipping |
| 显示位置的偏移 | 属性 | contentOffset |
| 固定的宽/高 | 属性 | fixedHeight fixedWidth |
| 字体/大小/样式 | 属性 | font fontSize fontStyle |
| 图片和文本的组合方式 | 属性 | imagePosition |
| 行距(只读) | 属性 | lineHeight |
| Untitled | 属性 | onActive onFocused onHover onNormal |
| 加在背景图片上的多余空间 | 属性 | overflow |
| 是否允许 HTML 标签的文本格式 | 属性 | richText |
| 是否允许水平/垂直方向上拉伸 | 属性 | stretchWidth stretchHeight |
| 文本是否自动换行 | 属性 | wordWrap |
自定义属性绘制器
当 Unity 内置的绘制器不能达到要求时,开发者也可以创建自定义绘制器。这里以创建一个自动将 Rotation 转换为 Quaternion 的属性绘制器为例。
首先需要定义该属性绘制器对应的属性 QuatConvAttribute ,定义在 Tools/CustomProperties/Scripts/QuatConvAttribute.cs 中:
using UnityEngine;

namespace InspectorExtension.CustomProperties {
		public class QuatConvAttribute : PropertyAttribute {
				bool _rad;

				public bool Rad {
						get { return _rad; }
				}

				public QuatConvAttribute (bool rad = false) {
						_rad = rad;
				}
		}
}
这里定义了属性的名称、调用方法等。其中包含一个可选参数 _rad 表示使用对象是否为弧度制。
然后需要在 Tools/CustomProperties/Editor/QuatConvDrawer.cs 中具体实现其绘制方法:
using UnityEngine;
using UnityEditor;
namespace InspectorExtension.CustomProperties {
[CustomPropertyDrawer (typeof (QuatConvAttribute))]
public class QuatConvDrawer : PropertyDrawer {
public override float GetPropertyHeight (SerializedProperty property, GUIContent label) {
return EditorGUI.GetPropertyHeight (property) * 2;
}
public override void OnGUI (Rect position, SerializedProperty property, GUIContent label) {
if (property.propertyType == SerializedPropertyType.Vector3) {
property.vector3Value = EditorGUI.Vector3Field (
new Rect (position.x, position.y, position.width, position.height / 2),
label,
property.vector3Value
);
Quaternion quaternion = ConvertQuaternion (property.vector3Value, (attribute as QuatConvAttribute).Rad);
EditorGUI.SelectableLabel (
new Rect (position.x, position.y + position.height / 2, position.width, position.height / 2),
string.Format(
"Quaternion Converted: (x: {0}, y: {1}, z: {2}, w: {3})",
quaternion.x,
quaternion.y,
quaternion.z,
quaternion.w
),
"label"
);
} else {
EditorGUI.HelpBox (
position,
"Cannot use attribute [QuatConv] on type " + property.propertyType.ToString () + ".",
MessageType.Error
);
}
}
Quaternion ConvertQuaternion (Vector3 rotation, bool useRad) {
if (!useRad) {
return Quaternion.Euler (rotation);
} else {
return Quaternion.Euler (
Mathf.Rad2Deg * rotation.x,
Mathf.Rad2Deg * rotation.y,
Mathf.Rad2Deg * rotation.z
);
}
}
}
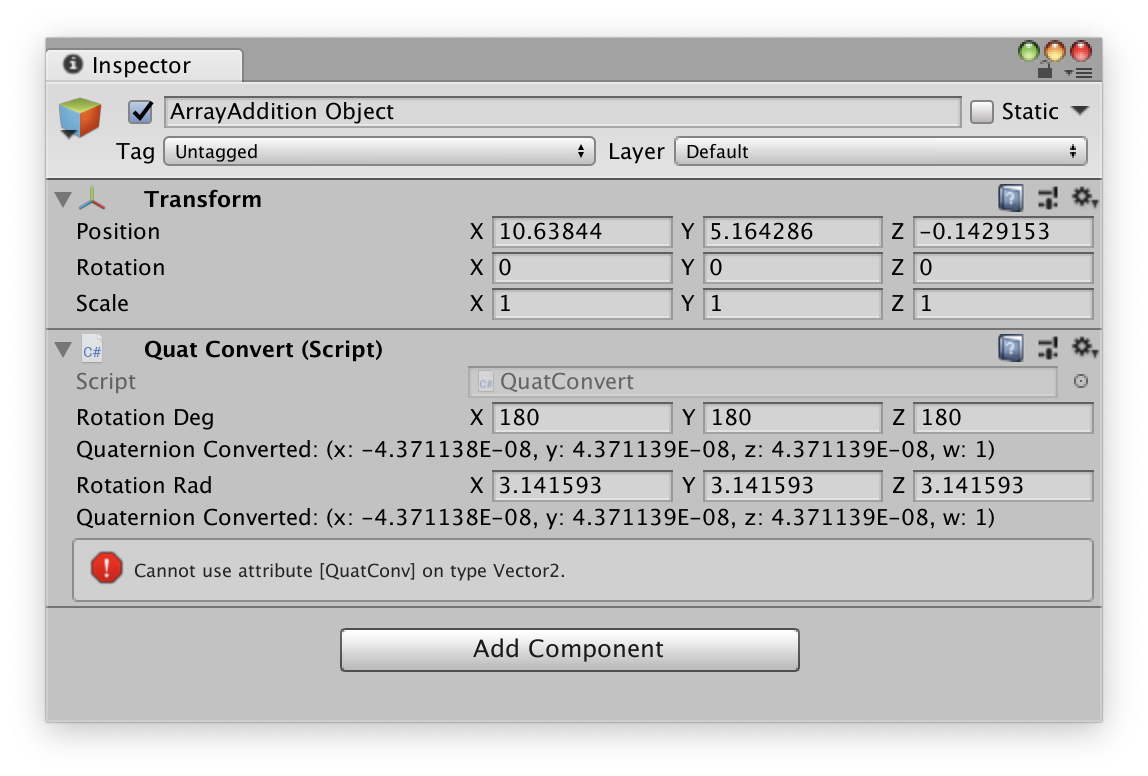
}最后要设置 QuatConv 的使用对象,在 Scripts/CustomProperties/QuatConvert.cs 中创建实例:
using UnityEngine;
using InspectorExtension.CustomProperties;

public class QuatConvert : MonoBehaviour {
		[QuatConv]
		public Vector3 _rotationDeg;

		[QuatConv (true)]
		public Vector3 _rotationRad;

		[QuatConv]
		public Vector2 _no;
}
将该脚本拖到某个物体上,编译后 inspector 面板如下:
自定义装饰绘制器
自定义装饰绘制器的步骤和属性绘制器基本一致,只是绘制器继承于 DecoratorDrawer 即可。 DecoratorDrawer 的 OnGUI 方法只包含绘制位置 position 一个参数,从中可以看出两种绘制器的不同。这里以创建一个绘制分割线的装饰绘制器为例。
在 Tools/CustomProperties/Scripts/LineAttribute.cs 中定义属性 LineAttribute ,包括属性名称、调用方法和可能涉及到的绘制参数(例如绘制分割线的长宽和对齐方式等):
using System;
using UnityEngine;

namespace InspectorExtension.CustomProperties {
		[AttributeUsage(AttributeTargets.Field, AllowMultiple = true)]
		public class LineAttribute : PropertyAttribute {
				bool _expanded = true;

				float _width = 100.0f;
				float _height = 2.0f;
				int _alignment = 0;

				public bool Expanded {
						get { return _expanded; }
				}

				public float Width {
						get { return _width; }
				}

				public float Height {
						get { return _height; }
				}

				public int Alignment {
						get { return _alignment; }
				}

				public LineAttribute (bool expanded = true, float height = 1.0f) {
						_expanded = expanded;

						_height = height;
				}

				public LineAttribute (float width, float height = 1.0f, int alignment = 0) {
						_expanded = false;

						_width = width;
						_height = height;
						_alignment = alignment;
				}
		}
}
然后在 Tools/CustomProperties/Editor/LineDrawer.cs 中具体实现其绘制方法:
using UnityEngine;
using UnityEditor;
namespace InspectorExtension.CustomProperties {
[CustomPropertyDrawer (typeof (LineAttribute))]
public class LineDrawer : DecoratorDrawer {
LineAttribute lineAttribute;
public override float GetHeight () {
return (attribute as LineAttribute).Height + 2.0f;
}
public override bool CanCacheInspectorGUI () {
return false;
}
public override void OnGUI (Rect position) {
lineAttribute = attribute as LineAttribute;
if (lineAttribute.Expanded) {
EditorGUI.DrawRect (
new Rect (position.x, position.y, position.width, lineAttribute.Height),
Color.black
);
} else {
switch (lineAttribute.Alignment) {
case 0:
EditorGUI.DrawRect (
new Rect (position.x, position.y, lineAttribute.Width, 1),
Color.black
);
break;
case 1:
EditorGUI.DrawRect (
new Rect (position.x + position.width - lineAttribute.Width, position.y, lineAttribute.Width, lineAttribute.Height),
Color.black
);
break;
case 2:
EditorGUI.DrawRect (
new Rect (position.x + position.width / 2 - lineAttribute.Width / 2, position.y, lineAttribute.Width, lineAttribute.Height),
Color.black
);
break;
}
}
}
}
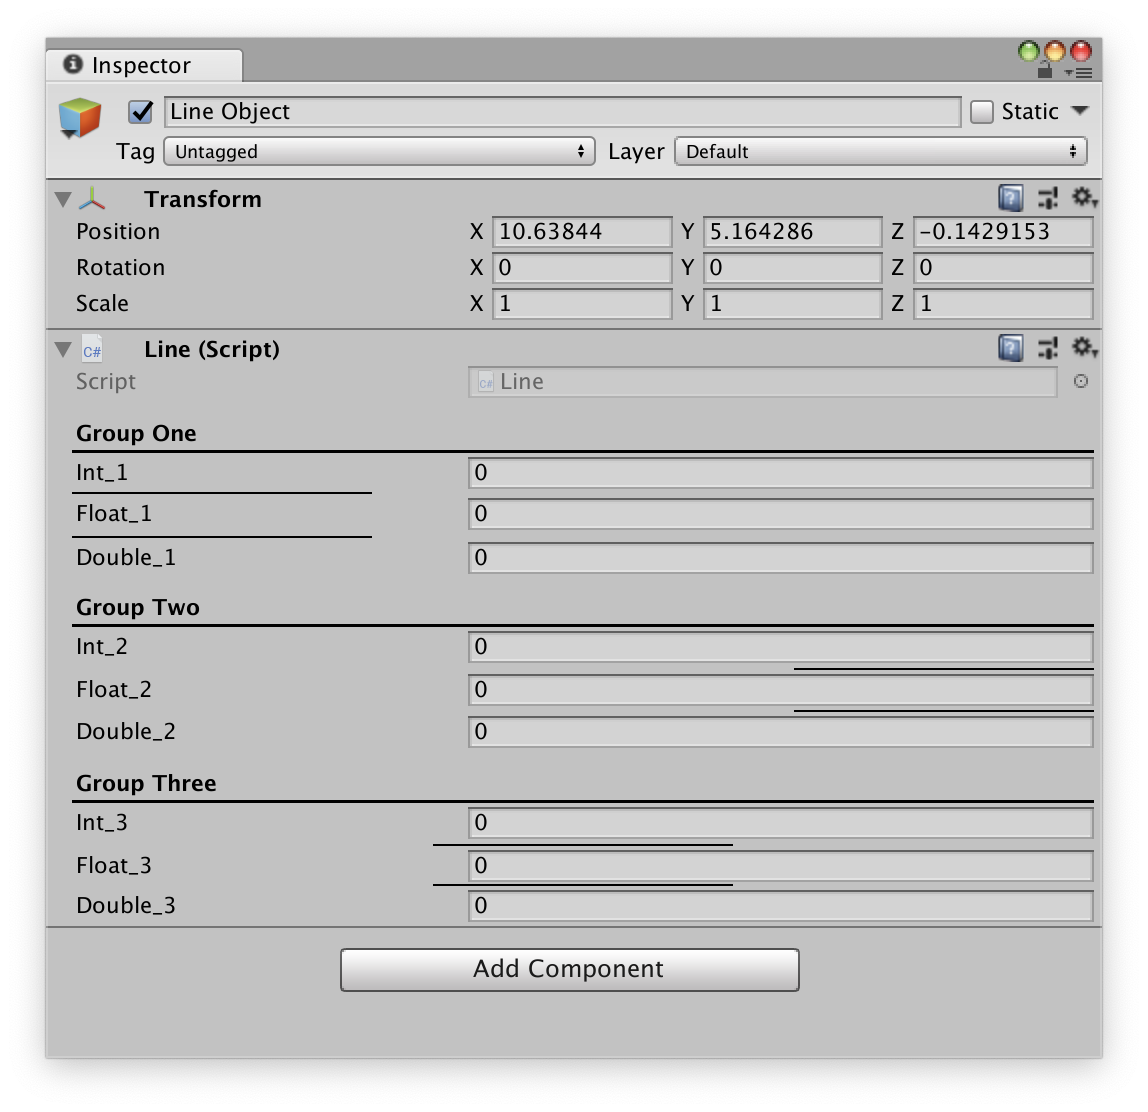
}最后要设置 Line 的使用对象,在 Scripts/CustomProperties/Line.cs 中创建实例:
using UnityEngine;
using InspectorExtension.CustomProperties;

public class Line : MonoBehaviour {
		[Header("Group One")]
		[Line (true, 1.5f)]
		public int _int_1;

		[Line (150.0f, 1.0f, 0)]
		public float _float_1;

		[Line (150.0f, 1.0f, 0)]
		public double _double_1;

		[Header ("Group Two")]
		[Line (true, 1.5f)]
		public int _int_2;

		[Line (150.0f, 1.0f, 1)]
		public float _float_2;

		[Line (150.0f, 1.0f, 1)]
		public double _double_2;

		[Header ("Group Three")]
		[Line (true, 1.5f)]
		public int _int_3;

		[Line (150.0f, 1.0f, 2)]
		public float _float_3;

		[Line (150.0f, 1.0f, 2)]
		public double _double_3;
}
将该脚本拖到某个物体上,编译后 inspector 面板如下:
自定义绘制器需要注意以下几点:
- 绘制器不支持 GUI 自动布局,所以在绘制过程中只可以使用
EditorGUI和GUI类,并需要将绘制控件的具体位置以参数的形式传入。
- 虽然不是必要要求,但一般习惯于将对应的属性命名为
XXXAttribute。具体将属性和对应的绘制器绑定起来的工作是由 Unity 内置的属性CustomPropertyDrawer完成的,只需将对应的属性的类型(如QuatConvAttribute和LineAttribute)传入即可。
- 除了绘制函数
OnGUI外,绘制器类中一般还需要手动重新实现GetPropertyHeight,用以返回绘制包含该属性的变量所需区域的高度,装饰绘制器中的GetHeight则是返回绘制装饰部分的高度。例如,QuatConvAttribute中返回一般区域的两倍高度以绘制三位旋转和新增的 Quaternion,LineAttribute中返回的是用户设定的分割线的高度外加两个像素。
在自定义 Inspector 中使用绘制器
上述的自定义绘制器和 Unity 内置绘制器,以 Attribute 的形式用在可以序列化的变量上,此时变量对应的控件都是以固定的方式绘制的(由绘制器绘制函数确定或者由 Unity 内置确定)。如果想在重新自定义 Inspector 面板时同时使用绘制器,则需要通过类 SerializedObject 和 SerializedProperty 以及控件 PropertyField 来实现。
以自定义控制器 QuatConv 为例,现意图将转换后的 Quaternion 内容以新的方式绘制。在假设不知道或者不关心转换的具体算法的情况下,需要通过代码获取默认绘制的 Quaternion 内容。首先我们依据先前自定义 Inspector 面板部分的方法将其余部分绘制在 Tools/CustomProperties/Editor/QuatConvInspector.cs 中:
using UnityEditor;
namespace InspectorExtension.CustomProperties {
[CustomEditor (typeof (QuatConvertWithInspector))]
public class QuatConvInspector : Editor {
QuatConvertWithInspector _target;
bool _showDeg, _showRad;
private void OnEnable () {
_target = (QuatConvertWithInspector)target;
}
public override void OnInspectorGUI () {
_showDeg = EditorGUILayout.Foldout (_showDeg, "Rotation in Degree", true);
EditorGUILayout.BeginVertical ("box");
if (_showDeg) {
// TODO: draw property _rotationDeg here
}
EditorGUILayout.LabelField (
string.Format(
"Value: ( X: {0}, Y: {1}, Z: {2} )",
_target.RotationDeg.x,
_target.RotationDeg.y,
_target.RotationDeg.z
)
);
EditorGUILayout.EndVertical ();
_showRad = EditorGUILayout.Foldout (_showRad, "Rotation Rad", true);
EditorGUILayout.BeginVertical ("box");
if (_showRad) {
// TODO: draw property _rotationRad here
}
EditorGUILayout.LabelField (
string.Format (
"Value: ( X: {0}, Y: {1}, Z: {2} )",
_target.RotationRad.x,
_target.RotationRad.y,
_target.RotationRad.z
)
);
EditorGUILayout.EndVertical ();
}
}
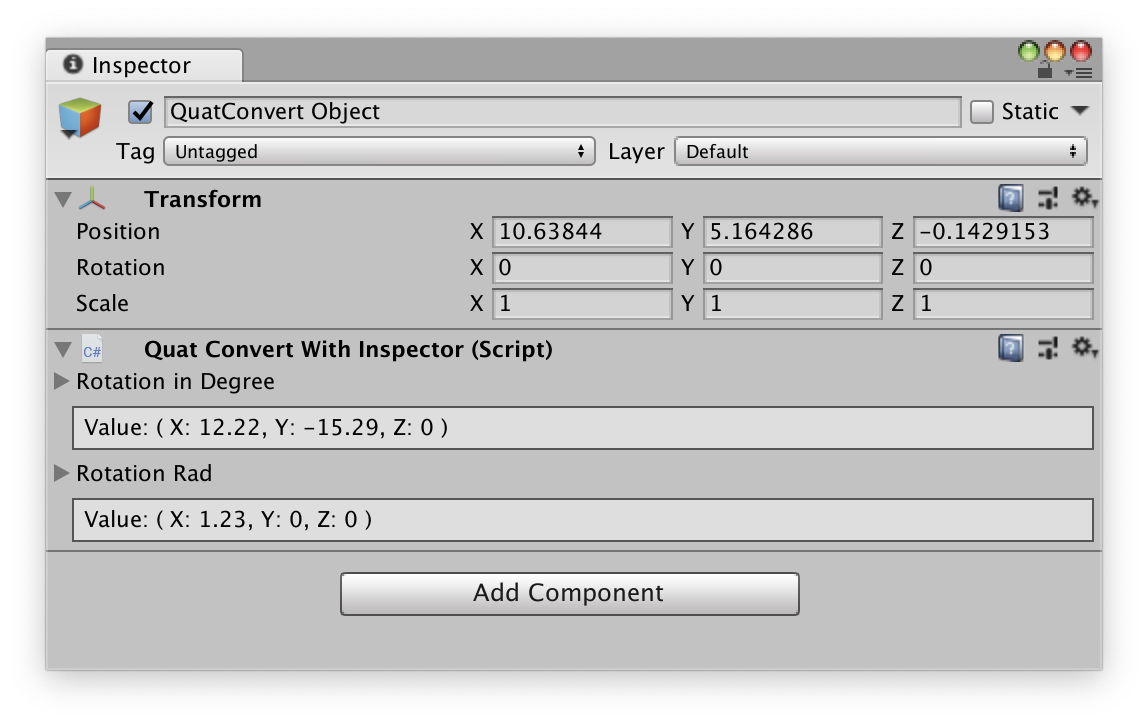
}结果如下:
为获取包含有绘制器的属性,首先需要声明三个新的变量
SerializedObject _object;
SerializedProperty _rotationDeg, _rotationRad;
然后在初始化时设置其值:
_object = new SerializedObject (_target);
_rotationDeg = _object.FindProperty ("_rotationDeg");
_rotationRad = _object.FindProperty ("_rotationRad");
之后即可在绘制过程中访问,并通过 PropertyField 绘制出来:
// TODO: draw property _rotationDeg here
EditorGUILayout.PropertyField (_rotationDeg, true);
_target.RotationDeg = _rotationDeg.vector3Value;

// ...

// TODO: draw property _rotationRad here
EditorGUILayout.PropertyField (_rotationRad, true);
_target.RotationRad = _rotationRad.vector3Value;
新的 Inspector 面板如下:
